Quinoa Crackers


Quinoa Crackers

Makes: approximately 48

IMG_0185-0

Ingredients:

  • 1/2 cup arrowroot flour
  • 3/4 cup wholemeal plain flour
  • 1/2 cup quinoa
  • 1/2 cup water
  • 1/4 cup olive oil
  • 1 tablespoon chia seeds
  • 1 tablespoon sesame seeds
  • 1/2 teaspoon salt
  • Big pinch of sugar

Method:

  • Preheat oven to 180 degrees Celsius (170 degrees Celsius for fan forced oven) and line two baking sheets with baking paper
  • Combine all dry ingredients and mix well and create a well in the middle
  • Pour the oil and water into the well and use a butter knife to mix the ingredients together until you have a nice soft dough
  • Turn the dough onto a clean lightly floured bench and knee until it’s a smooth ball
  • Halve the dough
  • Place the first half into one of the lines baking tray, place another piece of baking paper over the top and roll the dough out to the size of the tray or until it’s about 1-2mm thick
  • Use a pizza cutter or a sharp knife to cut the rolled dough into the desired shaped and size of the crackers you are after
  • Repeat with the second portion of dough
  • Bake for 15-25 minutes or until golden, cooking time will vary with the thickness of the cracker.

Recipe Notes:

  • Store in an air tight container in the pantry for up to a week
  • The dough is freezer friendly however the cooked crackers are not freezer friendly
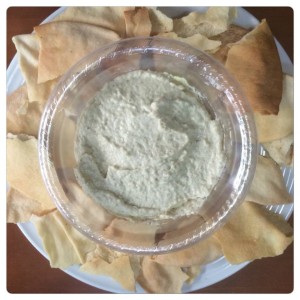
  • Delicious served with any of the C4K Kitchen dips as shown below with the C4K Kitchen’s Mushroom Paste

C4K Kitchen Title Bar

Disclaimer: C4K Kitchen does not hold any responsibility for the consumer using this recipe including the storage guidelines and time frames recommended in the recipe notes. The consumer holds all responsibilities to ensure that food hygiene and safety standards are adhered to.


Zucchini & Corn Fritters


Zucchini & Corn Fritters 

Makes: 8


Ingredients:

  • 300g can corn kernels, drained
  • 1 large zucchini, grated
  • 1 small onion, grated
  • 2 cloves garlic, grated
  • 1/2 long red chilli, finely diced
  • 1 tablespoon fresh parsley shredded
  • 60g reduced fat feta cheese, finely diced or crumbled
  • 2 eggs
  • 1/3 cup wholemeal plain flour
  • Salt & pepper, to taste

Method:

  • Place all ingredients into a mixing bowl and combine well
  • Heat 1 tablespoon rice bran oil in a heavy based frying pan over a medium heat
  • Place 1/8th of the mixture into a fritter shape in the frying pan  and repeat with as many as you can fit ensuring there is about 2cm between them for even cooking
  • Cook for 3-5 minutes until golden then flip and cook for another 3-5 minutes until golden
  • Place on a piece of kitchen paper to drain while you cook the remaining fritter batter.

Recipe Notes:

  • To ensure a consistent shape and size use an egg ring as your guide as to how much better is needed. Leave the ring on while cooking the first side, remove the egg ring then flip the fritter
  • Store covered in the fridge for a maximum of 3 days
  • This recipe is freezer friendly to be consumed within 6 months

C4K Kitchen Title Bar

Disclaimer: C4K Kitchen does not hold any responsibility for the consumer using this recipe including the storage guidelines and time frames recommended in the recipe notes.  The consumer holds all responsibilities to ensure that food hygiene and safety standards are adhered to.


Lemon & Garlic Chicken Mini Wraps


Lemon & Garlic Chicken Mini Wraps

Serves: 2

Lemon & Garlic Chicken Mini Wraps

Ingredients:

  • 2 chicken thigh fillets
  • 4 mini corn tortillas
  • 1/2 cup baby spinach
  • 1 spring onion
  • 1 small tomato
  • 1/2 small red capsicum
  • 2 tablespoons extra light cream cheese

Marinade Ingredients:

  • 2 tablespoons olive oil
  • 2 cloves garlic, very finely diced
  • 1 tablespoons, finely chopped fresh parsley
  • 2 tablespoons fresh lemon juice
  • Pinch ground black pepper


Method:

  • Place all the marinade ingredients into a small container with a lid and shake very well to combine
  • Use a meat tenderise to flatten out the chicken thigh to a more even cut of meat
  • Place the chicken and the marinade in zip lock bag and put in the fridge for a minimum of 4 hours but preferably overnight.
  • Heat a grill plate and then grill the chicken about 3-4 minutes each side until golden and cooked through.
  • Prepare the salad by placing the baby spinach in a mixing bowl adding in a finely sliced spring onion, diced tomato and diced red capsicum and combine tell
  • Heat the tortilla in a sandwich for 60 seconds, spread 1/2 tablespoon of cream cheese across each of the tortillas
  • Place 1/4 quarter of the salad on each of the tortillas and top with 1/4 of the sliced chicken
  • Either wrap or fold over and enjoy.


Recipe Notes:

  • Store covered in the fridge to use within 2 days
  • The chicken portion of this recipe is freezer friendly to be consumed within 3 months

C4K Kitchen Title Bar

Disclaimer: C4K Kitchen does not hold any responsibility for the consumer using this recipe including the storage guidelines and time frames recommended in the recipe notes.  The consumer holds all responsibilities to ensure that food hygiene and safety standards are adhered to.


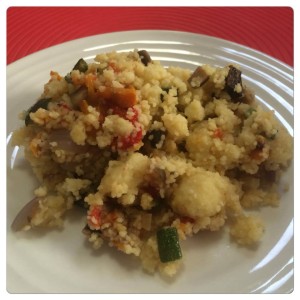
Roast Vegetable Couscous Salad


Roast Vegetable Couscous Salad

Serves: 6-8

Roast Vegetable Couscous Salad

Ingredients:

  • 150g butternut pumpkin
  • 1 red onion
  • 1 zucchini
  • 6 button mushrooms
  • 150g sweet potato
  • 1 carrot
  • 1 red capsicum
  • 1 yellow capsicum
  • 1 tablespoon minced garlic
  • 2 cups couscous
  • 50g butter, cubed
  • 1/4 cup extra virgin olive oil
  • 2 lemons


Method:

  • Preheat an oven to 180 degree Celsius
  • Dice all the pumpkin, zucchini, sweet potato and carrot into small cubes about ¾ cm in size and lay them out onto a roasting tray, drizzle the vegetables with olive oil and sprinkle with salt to taste. Roast this tray of vegetables for approximately 35-45 minutes until they are cooked and become golden and sticky.
  • At the same time as you put this tray of vegetables in spray the outside of each capsicum generous with cooking spray and place the whole capsicum(s) on the oven rack.
  • Dice the onion and the mushroom the same size and put in a smaller roasting tray. Drizzle with olive oil and sprinkle with salt to taste, add the garlic and stir well through the mushrooms and onion. Add this into the oven with 20 minutes remaining on the other vegetables. When adding in the second tray of vegetables also turn the capsicum.
  • When removing all vegetables from the oven set the two tray aside to cool and immediately place the capsicums in separate zip lock bags, remove all air and seal. Leave to sit for 10 minutes.
  • After leaving the vegetables to sit, remove the capsicums one at a time from the bags. The skin should quiet easily peel off skin, remove the core and the seed the dice the roasted capsicum flesh and add to the other roasted vegetables, repeat with the second capsicum.
  • Bring 2 ¼ cups of salted water to the boil on the stove. Once it is boiling remove from the stove and add in the couscous. Cover and leave for 4-5 minutes. Use a fork to loosen and fluff up the couscous while stirring through the diced butter
  • Add the vegetables to the couscous along with the olive oil and the juice of 2 lemons. Mix the vegetables and dressing through well and serve
  • The salad can be served warm or cold.


Recipe Notes:

  • Store covered in the fridge for a maximum of 3 days
  • This recipe is not suitable for the freezer

C4K Kitchen Title Bar

Disclaimer: C4K Kitchen does not hold any responsibility for the consumer using this recipe including the storage guidelines and time frames recommended in the recipe notes.  The consumer holds all responsibilities to ensure that food hygiene and safety standards are adhered to.


Roast Eggplant Dip


Roast Eggplant Dip

Roast Eggplant Dip

Ingredients:

  • 1 large or 2 small eggplants
  • 1 tablespoon tahini
  • 2 teaspoons extra virgin olive oil
  • 1 teaspoon fresh lemon juice
  • Salt & pepper, to taste


Method:

  • Preheat the oven to 180 degree, spray the eggplant(s) liberally with rice brand oil cooking spray and pierce the skin with a fork about 6 times evenly over the eggplant(s) surface and place them directly on the oven rack
  • Roast for about 20 minutes, then turn the eggplant(s) over then roast for another 20 minutes
  • Remove from the oven, allow to cool slightly then put in a plastic zip lock bag then set aside for 15 minutes
  • Peel of all the skin from the eggplant(s) and diced the roasted flesh
  • Place the roasted flesh and all other ingredients in a food processor or thermo cooking device, blitz until silky smooth [Speed 6, 10 seconds]
  • Keep in the fridge until you are ready to serve.


Recipe Notes:

  • Store in an airtight container in the fridge for a maximum of 7 days
  • This recipe is not freezer friendly

C4K Kitchen Title Bar

Disclaimer: C4K Kitchen does not hold any responsibility for the consumer using this recipe including the storage guidelines and time frames recommended in the recipe notes.  The consumer holds all responsibilities to ensure that food hygiene and safety standards are adhered to.


Roast Capsicum Dip


Roast Capsicum Dip

Roast Capsicum Dip

Ingredients:

  • 3 large red capsicums
  • 125g cream cheese, softened
  • 1 teaspoon minced garlic
  • Salt & pepper, to taste


Method:

  • Preheat oven to 200°C, place the capsicum on a baking tray and roast, turning occasionally until the skin is charred and blistered
  • Remove from the oven, sit for a couple minutes to cool slightly then place in a zip lock bag and set aside for 10 minutes
  • Remove the capsicum from the bag and peel the skin and remove the stem and seeds, they can be thrown out, do no rinse the flesh as it will ruins the flavour
  • Place capsicum, cream cheese, garlic and salt and pepper in a food processor or thermos cooking until and process until smooth [Speed 6; 10 seconds]
  • Keep in the fridge until you are ready to serve.


Recipe Notes:

  • Store covered in the fridge for a maximum of 7 days
  • This recipe is not freezer friendly

C4K Kitchen Title Bar

Disclaimer: C4K Kitchen does not hold any responsibility for the consumer using this recipe including the storage guidelines and time frames recommended in the recipe notes.  The consumer holds all responsibilities to ensure that food hygiene and safety standards are adhered to.


Pumpkin and Cherry Tomato Mini Quiches


Pumpkin and Cherry Tomato Mini Quiches

Makes: 36

Pumpkin & Cherry Tomato Mini Quiches

Ingredients:

  • 3 sheets frozen shortcrust pastry, defrosted
  • 100g pumpkin, finely diced
  • 1 punnet cherry tomatoes, diced
  • 1 cup grated cheese
  • 3/4 cup wholemeal plain flour
  • 6 eggs
  • 1/2 cup milk


Method:

  • Preheat the oven to 180 degrees Celsius
  • Place all the ingredients except eggs and milk into a large mixing bowl and mix well
  • In a separate mixing bowl crack all the eggs and add the milk and salt & pepper to taste whisking lightly until all combined then pour into the filling mix and stir well until well combined
  • Use a round cookie cutter (or egg ring) to cut circles in the pastry, do not throw out un-used pastry, this will be reused. To re-use the discarded pastry knead it together and roll it out to the same thickness as the original sheets and continue to cut your pastry discs
  • Spray the mini quiche tin well with rice bran oil spray, place the pastry disc into each well. Add in a tablespoon of the filling mix into the well until it’s just below the pastry level. Make sure your regularly stirring the filling mix as the heavier filling will sink to the bottom of the bowl
  • Bake for 15-20 minutes until golden brown on top.


Recipe Notes:

  • Store in an airtight container in the fridge for a maximum of 3 days
  • This recipe is freezer friendly to be consumed within 6 months

C4K Kitchen Title Bar

Disclaimer: C4K Kitchen does not hold any responsibility for the consumer using this recipe including the storage guidelines and time frames recommended in the recipe notes.  The consumer holds all responsibilities to ensure that food hygiene and safety standards are adhered to.


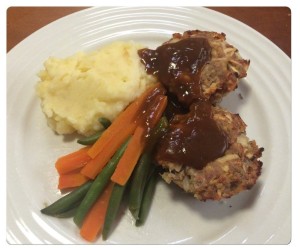
Pork and Apple Meat Muffins


Pork and Apple Meat Muffins

Serves: 4-6

Pork & Apple Meat Muffins

Ingredients:

  • 500g pork mince
  • 4 apples, peeled, cored and grated
  • 1 onion, finely diced
  • 1 tablespoon minced garlic
  • 200g stuffing mix (or breadcrumbs)
  • 1 teaspoon ground sage
  • 1 egg
  • 200ml apple juice


Method:

  • Preheat your oven to 180 degrees Celsius and prepare a muffin tray by greasing the muffin cups well with the rice bran oil spray
  • Add all the ingredients, except the apple juice into a bowl and use your hands to combine it very well
  • Divide the mixture evenly into the 12 muffin cup, make a small well in the centre of each of the meat muffins
  • Pour the apple juice evenly into each of the centre wells
  • Bake for 25-30 minutes.


Recipe Notes:

  • Store covered in the fridge for a maximum of 3 days
  • This recipe is freezer friendly

C4K Kitchen Title Bar

Disclaimer: C4K Kitchen does not hold any responsibility for the consumer using this recipe including the storage guidelines and time frames recommended in the recipe notes.  The consumer holds all responsibilities to ensure that food hygiene and safety standards are adhered to.


Montreal Bagels


Montreal Bagels

Makes: 12

IMG_5047

Ingredients:

  • 1 1/2 cups water
  • 2 tablespoons sugar
  • 3 tablespoons canola oil
  • 8g dried yeast
  • 1 small egg, lightly beaten
  • 1 tablespoon powdered milk
  • 4 1/2 cups white bread flour
  • 1 teaspoon salt
  • 1/2 cup sesame or poppy seeds
  • 6 litres of water
  • 1/3 cup honey


Method:

  • In a large bowl stir together the warm water, sugar, oil, yeast, egg and powdered milk, allow to sit for 2 minutes until the yeast starts to activate by bubbling on the surface
  • Stir in the salt and 1 cup of the flour and mix well
  • Gradually add in more flour until it is enough to make a soft dough
  • Knead the dough for 10-12 minutes adding extra flour as needed
  • When the dough is firm and smooth cover with the inverted bowl and sit for 10-20 minutes
  • Divide the dough into 12 equal portions, keep the portions you are not working with under the inverted bowl
  • Roll the portion of dough into a 20-25cm rope and curl the rope around your hand to make a bagel shape, dab your finger in some water and touch each end of the rope and seal the dough but pushing together and twisting slightly and place of a lightly floured clean and dry surface
  • Repeat for the other 11 portions
  • Cover the bagels loosely with glad wrap and allow to rise for 30-40 minutes
  • Preheat your oven to 220 degrees Celsius (200 degrees Celsius for fan forced) and line two baking trays with baking paper
  • Fill a stock pot with the water and add the honey and bring to the boil
  • When boiling drop 2 bagels in for 45 seconds, flip the bagels over and leave in the pot for another 45 seconds.
  • Remove and drain by sitting on a clean tea towel, sprinkle both sides liberally with sesame/poppy seeds and place on the baking tray
  • Repeat will all the bagels
  • Bake for 20 minutes, turning them once 10 minutes into the cooking process


Thermo-cooking method:

  • In a large bowl stir together the warm water, sugar, oil, yeast, egg and powdered milk [Speed 2, 37 degrees, 20 seconds]
  • Allow to sit for 2 minutes until the yeast starts to activate by bubbling on the surface
  • Stir in the salt and 2 cup of the flour [Speed 6, 10 seconds]
  • Add in another 2 cups of flour [Speed 6, 10 seconds]
  • Add in 1/2 cup of flour [Speed 1, 10 minutes]
  • Remove the dough from the jug and lightly knead to bring together and cover with an inverted bowl and sit for 10-20 minutes
  • Divide the dough into 12 equal portions, keep the portions you are not working with under the inverted bowl
  • Roll the portion of dough into a 20-25cm rope and curl the rope around your hand to make a bagel shape, dab your finger in some water and touch each end of the rope and seal the dough but pushing together and twisting slightly and place of a lightly floured clean and dry surface
  • Repeat for the other 11 portions
  • Cover the bagels loosely with glad wrap and allow to rise for 30-40 minutes
  • Preheat your oven to 220 degrees Celsius (200 degrees Celsius for fan forced) and line two baking trays with baking paper
  • Fill a stock pot with the water and add the honey and bring to the boil
  • When boiling drop 2 bagels in for 45 seconds, flip the bagels over and leave in the pot for another 45 seconds.
  • Remove and drain by sitting on a clean tea towel, sprinkle both sides liberally with sesame/poppy seeds and place on the baking tray
  • Repeat will all the bagels
  • Bake for 20 minutes, turning them once 10 minutes into the cooking process


Recipe Notes:

  • This recipe is based on the following recipe however I have altered as I am incapable of following a recipe:
    http://www.food.com/recipe/montreal-bagels-35261
  • Store in an airtight container for a maximum of 3 days
  • This recipe is freezer friendly to be consumed within 6 months


Different ways to serve your bagels:

Straight out of the oven with butter

IMG_5048

Classic Cream Cheese

IMG_5115

Pulled pork with gravy

IMG_5056

Cream cheese, bacon and tomato

IMG_5063

Crispy bacon and BBQ sauce

IMG_5079

C4K Kitchen Title Bar

Disclaimer: C4K Kitchen does not hold any responsibility for the consumer using this recipe including the storage guidelines and time frames recommended in the recipe notes.  The consumer holds all responsibilities to ensure that food hygiene and safety standards are adhered to.


Polenta Star Pizzas


Polenta Star Pizzas

Makes: approximately 18

Polenta Star Pizzas

Base Ingredients:

  • 750ml chicken stock
  • 190g instant polenta
  • 60g grated parmesan cheese
  • Salt and pepper to taste

Topping Ingredients:

  • 1/2 cup C4K Kitchen’s Mummas Magic Sauce
  • 100g diced bacon
  • 1 small onion, very finely diced
  • 1 cup grated cheese

Method:

  • Place the stock in a small saucepan and bring to the boil, steadily pour the polenta in a thin stream while constantly whisking and cook for 3-5 minutes constantly whisking
  • Remove from the heat and stir through the cheese and seasoning
  • Spread out the polenta onto a baking tray lined with baking paper to about 3/4cm thick
  • Leave to cool at room temperature for 30 minutes and then place in the fridge for a minimum of an hour
  • Remove the tray from the fridge and use a star shape (or whatever pizza shape you want to make) to cut out as many pizza bases as you can across the sheet of polenta.
  • To construct the pizzas, spread the MMS across the base of each of the star pizzas and then evenly spread the bacon and onion across the pizzas base and finally top with the grated cheese
  • Place the pizzas on a baking tray and cook in a 180 degrees Celsius oven for 15 minute of until the cheese is golden and bubbly.


Recipe Notes:

  • Store in an airtight container in the fridge for a maximum for 3 days
  • This recipe is freeze friendly to be consumed within 3 months

C4K Kitchen Title Bar

Disclaimer: C4K Kitchen does not hold any responsibility for the consumer using this recipe including the storage guidelines and time frames recommended in the recipe notes.  The consumer holds all responsibilities to ensure that food hygiene and safety standards are adhered to.