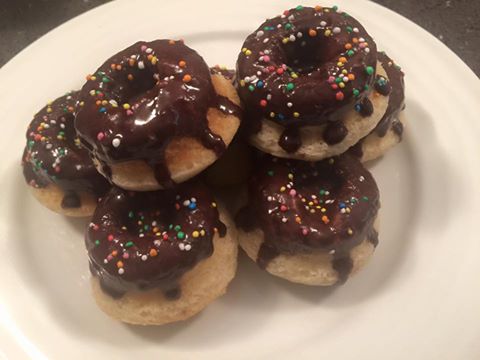
Dairy Free Egg Free Chocolate Glazed Donuts


Dairy Free, Egg Free Chocolate Glazed Donuts

Makes: 12 mini donuts or 6 large donuts

chocolate glazed donuts

Ingredients:

  • 1 1/2 cups flour
  • 2 teaspoons baking powder
  • 2 teaspoons vanilla
  • 1/4 cup brown sugar
  • Pinch salt
  • 3/4 cup almond milk
  • 3 tablespoons canola or coconut oil

Glaze Ingredients:

  • 1 cup icing sugar
  • 2 tablespoons nuttalex
  • 2 tablespoons almond milk
  • 1/4 cup unsweetened cocoa powder


Method:

  • Preheat your oven to 180 degrees Celsius and prepare your donut tin by well greasing
  • Place all ingredients for the donuts into a mixing bowl and using electric beaters for 2-3 minutes until the mixture comes together
  • Fill your donut tin to approximately 3/4 capacity with batter
  • Bake the mini donuts for 12-14 minutes or a standard sized donuts for 16-18 minutes
  • Remove the donuts to cool on the wire rack completely before glazing
  • To prepare the glaze place all the ingredients into a small saucepan over a medium-low heat and using a spatula to mix the ingredients as they melt together
  • When you have a thick glossy glaze remove from the heat and dip the donut into the glaze
  • Sprinkle with your choice of topping or leave with a smooth glaze
  • Repeat with all donuts
  • You may need to slightly reheat the glaze if it cools too much and become to thick to coat your donuts.


Recipe Notes:

  • Store in an airtight container for the maximum of 5 days.
  • This recipe is freezer friendly to be consumed within 3 months.

C4K Kitchen Title Bar

Disclaimer: C4K Kitchen does not hold any responsibility for the consumer using this recipe including the storage guidelines and time frames recommended in the recipe notes. The consumer holds all responsibilities to ensure that food hygiene and safety standards are adhered to.


Slab Cake


Slab Cake

Serves: 30 people

Slab Cake

Ingredients:

  • 350g butter, room temperature
  • 3 cups plain flour
  • 2 teaspoons baking powder
  • 1 teaspoon salt
  • 1 1/2 teaspoon vanilla
  • 1 1/2 cup sugar
  • 1 cup milk
  • 8 egg whites

Method:

  • Preheat the oven to 180 degrees (160 degrees for fan forced oven) and grease and line a slab cake tin that is 20 x 30cm
  • Sift flour, baking powder and salt together
  • Cream the butter and 1 cup of sugar together until light and fluffy, approximately 5 minutes
  • Add vanilla and milk fold through the flour mixture 1/2 cup at a time until all combined then set aside
  • Beat the eggs whites in a clean bowl until foamy, then add in the extra 1/2 cup sugar and beat until stiff and gloss, approximately 5 minutes
  • Fold the egg mixture into the batter mix 1/3rd at a time
  • Transfer the well mixed batter into a baking tray and smooth evenly
  • Bake for 35-45 minutes
  • Allow to cool for 10 minutes in the baking tin before transferring onto a wire rack to cool completely


Recipe Notes:

  • Store fully wrapped in glad wrap or in an air tight container for a maximum of 3 days before use
  • This recipe is freezer friendly, wrap completely in gladwrap, double layered for up to 30 days before use, to make your icing and decorating experience easier start decorating when the cake has half defrosted.
  • This recipe is an ideal, easy and delicious recipe to use with heavier icing like fondant and is also a suitable cake to carve to desired shape
  • Slab Cake Decorated


C4K Kitchen Title Bar

Disclaimer: C4K Kitchen does not hold any responsibility for the consumer using this recipe including the storage guidelines and time frames recommended in the recipe notes. The consumer holds all responsibilities to ensure that food hygiene and safety standards are adhered to.


Vegetarian “Sausage” Rolls

Vegetarian”Sausage” Rolls

Makes: 12 standard sausage rolls or 36 party sized sausage rolls

Vegetarian Sausage Rolls

Ingredients:

  • 3 sheets of puff pastry, defrosted
  • 500g potatoes
  • 1 tablespoon butter
  • 2 tablespoons milk
  • 1 tablespoon rice bran oil
  • 1 onion, finely diced
  • 1 celery stalk, finely diced
  • 3 cloves garlic, finely diced
  • 1 medium carrot, grated
  • 1 zucchini, grated
  • 100g sweet potato, grated
  • 100g cauliflower including stem, grated
  • 2 heaped tablespoons tahini
  • 1 teaspoon curry powder
  • 1 teaspoon ground cumin
  • 1 teaspoon ground coriander
  • 1 teaspoon onion salt
  • 1 egg, lightly beaten
  • 1/2 cup grated Parmesan cheese
  • 2 tablespoons extra milk
  • 1 tablespoon sesame seed or poppy seeds (optional)


Method:

  • Peel and chop your potatoes into roughly the same sized pieces and place in a saucepan, cover with water and simmer for 10-15 minutes until the potatoes are soft
  • Drain all of the water and mash the potatoes using a potato masher or fork
  • Add in the butter, milk and some salt and pepper to your taste and mix well
  • Set the potato aside to cool while you prepare the vegetable mince
  • Heat 1 tablespoon rice bran oil in a large heavy based frying pan over a medium heat, then add in the onion, celery and garlic and saute off for 2-3 minutes until the onion has slightly become translucent
  • Add in the remaining grated vegetables and 1/4 cup water and simmer for about 5 minutes to allow all of the vegetables to soften
  • Add in the tahini, curry powder, cumin, coriander and onion salt and stir through vegetable mince until the spices are aromatic, approximately 3-5 minutes
  • Remove the spiced vegetable mince from the heat, add to the mashed potato, cheese and the egg and stir until well combined, then set aside to cool completely.
  • Preheat your oven to 180 degrees Celsius line 2 baking trays with baking paper
  • Slice your puff pastries sheets down the middle to have 2 equal sized rectangles
  • Down the middle of one pastry rectangles even spread 1/6th of the filling in a sausage shape, fold over both sides of the pastry ensure the pastry cross over by at least 1/2cm then use the tip of a fork to pierce the pastry join to interlock the two layers of pastry
  • Cut the log into half for standard sized sausage rolls or into 6 for party sized sausage rolls
  • Place the sliced sausage rolls on the prepared tray
  • Repeat with the remaining pastry and filling until you have completed
  • Brush the top with the additional milk and sprinkle with sesame or poppy seed
  • Bake for 25-30 minutes until golden brown
  • Allow to cool for at least 10 minutes on the tray before moving to a wire rack to cool completely


Recipe Notes:

  • Store in an airtight container in the fridge for a maximum of 5 days
  • This recipe is freezer friendly either prepared and uncooked OR cooked and ready to reheat & eat and to be consumed within 6 months

C4K Kitchen Title Bar

Disclaimer: C4K Kitchen does not hold any responsibility for the consumer using this recipe including the storage guidelines and time frames recommended in the recipe notes.  The consumer holds all responsibilities to ensure that food hygiene and safety standards are adhered to.


C4K Jelly Slice


Jelly Slice

Makes: 24 squares

C4K Jelly Slice

Base Layer Ingredients:

  • 250g scotch finger biscuits
  • 150g butter, melted
  • Pinch cinnamon

Middle Layer Ingredients:

  • 395g can condensed milk
  • 2 tablespoons lemon juice
  • 1 tablespoon lime juice
  • 3/4 cup boiling water
  • 2 teaspoons gelatine

Top Layer Ingredients:

  • 1 standard packet raspberry jelly crystals


Method:

  • Grease and line a brownie tin (18 x 25cm rectangle tin) or a 20cm square tin with double layers of baking paper ensuring there is a minimum of 2cm overhang on both long sides of the tin
  • Either the biscuits is a food processor until a chunky crumb and then stir through the melted butter and cinnamon
  • Push the mixture firmly into the base of the prepared tin packing down firmly
  • Place in the fridge for 30 minutes
  • To prepare the middle layer, whisk together the condensed milk with the lemon and lime juice until combined
  • Sprinkle the gelatine over the boiling water and quickly stir well until completely dissolved
  • Stir the gelatine mix into the condensed milk mix and whisk until well combined and smooth
  • Pour over the biscuit base and place in the fridge for 1 hour
  • To prepare the top layer, follow the instructions on the jelly packet EXCEPT using 100ml less cold water than recommended
  • Allow the dissolved and well mixed jelly to sit for 10 minutes to reduce to room temperature and then pour very gently over the middle layer
  • Return to the fridge to set for a minimum of 3 hours, however best if left overnight
  • Slice into even square and serve


Recipe Notes:

  • Store in an airtight container in the fridge for a maximum of 7 days…..if it lasts that long
  • This recipe is not freezer friendly

C4K Kitchen Title Bar

Disclaimer: C4K Kitchen does not hold any responsibility for the consumer using this recipe including the storage guidelines and time frames recommended in the recipe notes.  The consumer holds all responsibilities to ensure that food hygiene and safety standards are adhered to.


Cherry Ripe Brownies


Cherry Ripe Brownie

Makes: 24 squares

Cherry Ripe Brownie

Brownie Ingredients:

  • 3 eggs, beaten
  • 1/2 cup maple syrup
  • 1/4 cup milk
  • 1/3 cup butter, melted
  • 1/2 teaspoon baking soda
  • 1 teaspoon apple cider vinegar
  • 1/3 cup coconut flour
  • 3 tablespoons cacao powder

Filling Ingredients:

  • 300g pitted cherries, drained (fresh, frozen or canned)
  • 100g shredded coconut
  • 60g chia seeds
  • 90g coconut oil, melted
  • 2 tablespoons maple syrup

Topping Ingredients:

  • 200g dark chocolate
  • 1 tablespoon coconut oil


Method:

  • Preheat the oven to 180 degrees and prepare either a brownie tin (18 x 25cm) or a 20cm square tin by greasing and lining with baking paper with an overhang on 2 opposite sides to allow the slice to be easily lifted out once set
  • Whisk together the eggs, maple syrup, milk, butter, baking soda and the vinegar until well combined
  • Mix through the cacao and coconut flour until smooth and well combined
  • Pour the batter evenly into the prepared tin
  • Bake for 25-30 minutes or until the centre is set
  • Remove from the oven, leave the brownie in the tin and sit for at least 15 minutes before preparing the filling.
  • To prepare the filling, place all the ingredients into a food processor and pulse until combined and textured with some small lumps of cherries.
  • Spread the mixture evenly over the brownie base and place in the freezer while you prepare the topping.
  • To prepare the topping, place the dark chocolate and coconut oil in an small heatproof bowl and sit over a saucepan of simmering water stirring with a butter knife until melted
  • Spread the topping evenly over the cherry filling and place on a flat surface in the fridge for a minimum of 3 hours, but preferably overnight to allow to set.


Recipe Notes:

  • To increase the vibrancy of the middle layer you can add in a small amount of red food colouring.
  • To slice use a sharp blade knife dipping the blade into a jar of boiling water between each slice to easily slide the knife through the slice
  • Store in an airtight container in the fridge for a maximum of 7 days (if it lasts that long)
  • The brownie base is freezer friendly on its on but it is not suitable for freezing as a complete slice
  • To make the brownie base dairy free you can replace the milk with coconut milk and the butter with nuttalex or coconut oil

C4K Kitchen Title Bar

Disclaimer: C4K Kitchen does not hold any responsibility for the consumer using this recipe including the storage guidelines and time frames recommended in the recipe notes.  The consumer holds all responsibilities to ensure that food hygiene and safety standards are adhered to.


Coconut Crusted Chicken


Coconut Crusted Chicken

Serves: 4

Coconut Crusted Chicken

Ingredients:

  • 2 chicken breasts
  • 1/2 cup plain flour
  • 2 eggs, lightly beaten
  • 1/4 cup milk or natural yoghurt
  • 1 cup shredded coconut
  • 3/4 cup panko breadcrumbs


Method:

  • Cut your chicken breasts into 4 or 5 chicken tender shapes
  • Prepare 3 bowls to facilitate crumbing your chicken
  • In bowl 1; add the plain flour and season to taste (1 teaspoon garlic salt used in photo)
  • In bowl 2; add in the eggs and milk/yoghurt and whisk lightly to bring together
  • In bowl 3; mix together the shredded coconut and panko crumbs until well combined
  • For each piece of chicken coat completely in the seasoned flour, then dip into the egg washing until fully coated then finally roll in the coconut crumb mix until very well coated
  • Repeat with all pieces of chicken
  • Heat 3 tablespoons of rice bran oil in a heavy based frying pan over a medium-high heat and cook the chicken for approximately 4-5 minutes each side or until golden and crispy or until cooked through
  • Place on a piece of kitchen paper towel to drain excess oil before serving and while you cook the remaining chicken pieces
  • Alternative, spray the chicken pieces with some rice bran oil cooking spray and bake the chicken pieces in a preheated 180 degree Celsius oven for 20-25 minutes until golden and cooked through.


Recipe Notes:

  • Store covered in the fridge for a maximum of 2 days
  • This recipe is freezer friendly. You can freeze uncooked if made from fresh meat and you can freeze cooked, all to be consumed within 3 months.


C4K Kitchen Title Bar

Disclaimer: C4K Kitchen does not hold any responsibility for the consumer using this recipe including the storage guidelines and time frames recommended in the recipe notes.  The consumer holds all responsibilities to ensure that food hygiene and safety standards are adhered to.


Turkey & Cranberry Meatballs


Turkey & Cranberry Meatballs

Makes: approximately 24 (depending on your preferred meatball size)Turkey & Cranberry Meatballs

Ingredients:

  • 500g turkey mince
  • 1/2 cup dried cranberries, finely chopped
  • 1 teaspoon minced garlic
  • 1 egg
  • 1/2 cup breadcrumbs
  • 2 tablespoons plain flour


Method:

  • Place all ingredients, except the plain flour into a bowl and use your hands to mix the ingredients ensuring they are well combined
  • Roll into small meatballs and very lightly coat in the plain flour
  • Add a small amount of rice bran oil into the base of a heavy based frying pan and fry the meatballs off in batches for approximately 10-15 minutes, depending on the size of your meatballs.
  • Once they have cooked through remove from the frying pan and repeat the cooking process until they are all cooked
  • If you prefer spray the meatballs generously with cooking oil spray and oven bake in 180 degree oven for about 15-20 minutes or until cooked through, please note the time will vary depending on the size of the meatball.


Recipe Notes:

  • Store covered for a maximum of 2 days
  • This recipe is freezer friendly
  • When reheating meatballs from frozen either in the oven or the frying pan ensure there is a little bit of water or stock in the bottom of the pan to help keep the meatballs hydrated


C4K Kitchen Title Bar

Disclaimer: C4K Kitchen does not hold any responsibility for the consumer using this recipe including the storage guidelines and time frames recommended in the recipe notes.  The consumer holds all responsibilities to ensure that food hygiene and safety standards are adhered to.


Steamed Dim Sims


Steamed Dim Sims

Makes:approximately 36

Steamed Dim Sims

Ingredients:

  • 500g pork mince
  • 2 egg whites, lightly beaten
  • 1 teaspoon soy sauce
  • 1 teaspoon sesame oil
  • 1 cup grated carrot
  • 1 cup finely shredded wombok
  • 1/2 cup chopped bean sprouts
  • 1 packet wonton wrappers


Method:

  • Place mince, 3/4 of the beaten egg whites and all remaining ingredients, except the wrappers and use your hands to combine the ingredients well
  • Mix the 1/4 of the beaten egg whites with 1/4 cup of water and beat together well
  • Place a tablespoon of mixture in the middle of the wrapper and shape in a cylinder shape
  • To fold:
    * Dampen on all 4 sides of the wonton wrapper with the egg glaze
    * Pinch the 4 flat sides up to the mixture
    * Pinch in at the base of the point and fold up and over the mixture
    * Repeat on the opposite corner, gently press the mixture back under the two opposite corner folds to push back to the original cylinder shape
    * Repeat the pinch and fold over with the 2 remaining corners
    * Dampen your finger with egg glaze and ensure the top joins are moist
    * Finally gently roll the complete little parcel between your hands to delivery the cylindrical dim sim shape
  • Repeat the folding and rolling process until all of the dim sim mixture is gone
  • To cook place the dim sims in a bamboo steamer basket but do not overcrowd and allow at least 1-2cm between each dim sim and place over steadily simmers water and steam for 10-15 minutes or until the pork is cooked through and the wrappers are soft and wrinkly
  • Serve with your dipping sauce of choice.


Recipe Notes:

  • Store covered in the fridge for a maximum of 3 days
  • This recipe is freezer friendly when the dim sims have been rolled but not yet steamed
  • The dim sims can also be deep fried, however steaming is the healthier alternative.

C4K Kitchen Title Bar

Disclaimer: C4K Kitchen does not hold any responsibility for the consumer using this recipe including the storage guidelines and time frames recommended in the recipe notes.  The consumer holds all responsibilities to ensure that food hygiene and safety standards are adhered to.


Victorian Sponge Cake


Victorian Sponge Cake

Makes: 1 Luscious 20cm cake

Victorian Sponge Cake

Ingredients:

  • 200g caster sugar
  • 200g softened butter, cubed
  • 200g self raising flour, sifted
  • 1 teaspoon baking powder
  • 4 eggs, lightly beaten at room temperature
  • 2 tablespoons milk


Method:

  • Preheat your oven to 190 degrees Celsius (170 for fan forced) it is essential that your oven is fully heated before putting your cake in otherwise it will not rise properly
  • Grease and line with non stick baking paper two x 20cm round cake tins
  • In a large bowl neat together all the ingredients with electric beaters until you have a silky smooth batter


  • THERMOCOOKING: Place all ingredients in the jug with the butterfly attachment [Speed 3, 30 seconds] scrape down the side with a spatula [Speed 3, 30 seconds]


  • Pour the batter evenly between the two prepared cake tins and smooth the mixture over with the back of a spoon
  • Bake for 20 minutes under golden and the cake springs back when gently touched
  • Allow to cool in the cake tin for 5 minutes before turning onto a wire rack to cool completely
  • Once the cakes have cooled completely fill with your choice of fillings and lightly dust the top of the cake with icing sugar


Recipe Notes:

  • Store in an airtight container below 27 degrees for a maximum of 5 days
  • This cake is freezer friendly unfilled
  • The picture shown has the cake will C4K Kitchen’s Raspberry Chia Jam and Raspberry Buttercream as a filling
  • You can cook as one full cake however will need to adjust the cooking time for an extra 5-10 minutes to allow the cake to cook through


C4K Kitchen Title Bar

Disclaimer: C4K Kitchen does not hold any responsibility for the consumer using this recipe including the storage guidelines and time frames recommended in the recipe notes.  The consumer holds all responsibilities to ensure that food hygiene and safety standards are adhered to.


Tuna & Corn Dip


Tuna & Corn Dip

Tuna & Corn Dip

Ingredients:

  • 250g cream cheese
  • 400g creamed corn
  • 185g tuna in springwater, drained and crumbled


Method:

  • Heat the cream cheese in a small microwave safe dish for 45 seconds or until softened and mixable
  • Add the creamed corn and the tuna and mix until well combined.


Recipe Notes:

  • Store in airtight container in the fridge for a maximum of 7 days
  • Also a great filling for sandwiches, scrolls and wraps or on toast


C4K Kitchen Title Bar


Disclaimer: C4K Kitchen does not hold any responsibility for the consumer using this recipe including the storage guidelines and time frames recommended in the recipe notes.  The consumer holds all responsibilities to ensure that food hygiene and safety standards are adhered to.